|
|
| |
| |
CroftSoft
/
Library
/
Tutorials
Using the rust-webpack-template
2022-11-26
David Wallace Croft
Update 2023-01-02:
The
Rust-webpack Project Setup tutorial checklist
is an updated alternative to using the rust-webpack-template.
Contents
Project Setup
This section is based on using version 0.2.0 of the
rust-webpack-template.
-
Install
git
-
Install
Rust
-
If you previously installed Rust, you can update it:
rustup update
-
Install
Visual Studio Code (VS Code)
-
Install the following VS Code extensions
-
Install
node.js
-
This will also install Node Package Manager (npm)
-
Initialize your project directory using the
rust-webpack-template:
npm init rust-webpack project-name
cd project-name/
code .
-
Initialize your local git repository and make your first commit
-
This initial commit serves as a snapshot of the files prior to manual changes
git init
git add .
git commit -m "npm init rust-webpack"
-
Launch the webpack development server
-
The first time you run this command, it might take a few minutes to start
npm start
-
You can stop the webpack development server using Control-C
-
Set the Node.js options environment variable
-
This is only necessary if the command in the previous step failed with an error
-
For details, see this
Stack Overflow question
export NODE_OPTIONS=--openssl-legacy-provider
npm start
-
Using
cross-env
is an alternative to setting the environment variable at the command line
npm i -D cross-env
-
Update your npm run script in package.json to use cross-env
{
  [...]
  "scripts": {
    [...]
    "start": "rimraf dist pkg && cross-env NODE_OPTIONS=--openssl-legacy-provider webpack-dev-server --open -d",
    [...]
  },
  [...]
}
-
Stop the webpack development server using Control-C
-
Commit your changes to package.json
git add .
git commit -m "node.js options environment variable"
-
Verify that "Hello world!" is showing in your browser developer console
-
In some browsers, you can press the F12 key to open the browser developer console
-
Update the properties in the package section of your Cargo
manifest file Cargo.toml
[package]
name = "project-name"
version = "0.1.0"
authors = ["First Middle Last <username@domain.name>"]
# Use the categories from https://crates.io/categories
# categories = ["category"]
description = "project description"
edition = "2021"
homepage = "https://www.domain.name/"
keywords = ["keyword"]
# Remark this line out if your project is not open source
license = "MIT"
# Remark this line out when you publish to crates.io
publish = false
readme = "README.md"
# Remark this line out if your project is not in a code repository
repository = "https://github.com/github-username/project-name"
-
Unremark the wee-alloc feature
[features]
# If you uncomment this line, it will enable `wee_alloc`:
default = ["wee_alloc"]
-
Remove or remark out the console_error_panic_hook section
# [target."cfg(debug_assertions)".dependencies]
# console_error_panic_hook = "0.1.5"
-
If you leave it in, you will get a warning message:
warning: Found `debug_assertions` in `target.'cfg(...)'.dependencies`. This
value is not supported for selecting dependencies and will not work as expected.
-
Reinsert console_error_panic_hook at the beginning of the dependencies section
-
But do not include [target."cfg(debug_assertions)".dependencies]
[dependencies]
console_error_panic_hook = "0.1.5"
-
Customize the README.md file in your project root directory
# Project Name

- Project description

## Usage

- cd project-name/
- npm run build
- npm start

## History

- Initial release: YYYY-MM-DD
-
Make a
rustfmt.toml
in your project root directory
# https://rust-lang.github.io/rustfmt/
array_width = 1
# blank_lines_lower_bound = 1
chain_width = 80
fn_args_layout = "Vertical"
# group_imports = "StdExternalCrate"
hard_tabs = false
# imports_layout = "HorizontalVertical"
match_block_trailing_comma = true
# https://www.w3.org/WAI/tutorials/page-structure/styling/#line-length
max_width = 80
merge_derives = true
newline_style = "Unix"
remove_nested_parens = true
reorder_imports = true
reorder_modules = true
single_line_if_else_max_width = 0
struct_lit_width = 0
struct_variant_width = 0
tab_spaces = 2
use_try_shorthand = true
# version = "Two"
# wrap_comments = true
-
If your project is open source, make a LICENSE.txt file
MIT License

Copyright (c) [year] [copyright-holder-name]

Permission is hereby granted, free of charge, to any person obtaining a copy
of this software and associated documentation files (the "Software"), to deal
in the Software without restriction, including without limitation the rights
to use, copy, modify, merge, publish, distribute, sublicense, and/or sell
copies of the Software, and to permit persons to whom the Software is
furnished to do so, subject to the following conditions:

The above copyright notice and this permission notice shall be included in all
copies or substantial portions of the Software.

THE SOFTWARE IS PROVIDED "AS IS", WITHOUT WARRANTY OF ANY KIND, EXPRESS OR
IMPLIED, INCLUDING BUT NOT LIMITED TO THE WARRANTIES OF MERCHANTABILITY,
FITNESS FOR A PARTICULAR PURPOSE AND NONINFRINGEMENT. IN NO EVENT SHALL THE
AUTHORS OR COPYRIGHT HOLDERS BE LIABLE FOR ANY CLAIM, DAMAGES OR OTHER
LIABILITY, WHETHER IN AN ACTION OF CONTRACT, TORT OR OTHERWISE, ARISING FROM,
OUT OF OR IN CONNECTION WITH THE SOFTWARE OR THE USE OR OTHER DEALINGS IN THE
SOFTWARE.
-
Update the properties in the package.json file:
{
  "name": "project-name",
  "version": "0.1.0",
  "author": "First Middle Last <username@domain.name>",
  "description": "[...]",
  "scripts": {
    [...]
  },
  "devDependencies": {
    [...]
  }
}
-
Change the title in index.html
<!DOCTYPE html>
<html>
<head>
<meta
  charset="utf-8">
<title>
Project Name
</title>
</head>
<body>
<noscript>
Enable JavaScript in your browser to view the content of this webpage.
</noscript>
<script
  src="./bootstrap.js">
</script>
</body>
</html>
-
Test your code again
npm start
-
Commit your code changes and push the commit to your remote code repository
-
Update your Cargo dependencies
cargo add --dev futures@0.3.25
cargo add --dev js-sys@0.3.60
cargo add --dev wasm-bindgen-futures@0.4.33
cargo add --dev wasm-bindgen-test@0.3.33
cargo add console_error_panic_hook@0.1.7
cargo add wasm-bindgen@0.2.83
cargo add web-sys@0.3.60
cargo add wee_alloc@0.4.5
cargo update
-
Test your code again
npm start
-
Commit your code changes and push the commit to your remote code repository
-
Update your npm dependencies
npm outdated
npm update --save
-
Test your code again
npm start
-
Commit your code changes and push the commit to your remote code repository
Testing
This section shows you how to run the automated tests.
-
Follow the instructions in the previous section
-
Remove or remark out the following test from tests/app.rs
// // This runs a unit test in the browser, and in addition it supports asynchronous Future APIs.
// #[wasm_bindgen_test(async)]
// fn async_test() -> impl Future<Item = (), Error = JsValue> {
//   // Creates a JavaScript Promise which will asynchronously resolve with the value 42.
//   let promise = js_sys::Promise::resolve(&JsValue::from(42));

//   // Converts that Promise into a Future.
//   // The unit test will wait for the Future to resolve.
//   JsFuture::from(promise).map(|x| {
//     assert_eq!(x, 42);
//   })
// }
-
Remove your unused imports
-
After doing so, you will only have the following imports remaining
use wasm_bindgen_test::{wasm_bindgen_test, wasm_bindgen_test_configure};
-
Replace the placeholder test assertions
-
This removes the warning "identical args used in this `assert_eq!` macro call"
  // assert_eq!(1, 1);
  assert_eq!(String::from("1"), String::from("1"));
-
Add at least one browser option to the
wasm-pack test
command in package.json
-
This prevents an error message: "Error: Must specify at least one of [...]"
{
  [...]
  "scripts": {
    [...]
    "test": "cargo test && wasm-pack test --firefox --headless"
  },
  [...]
}
-
Use the npm run script "test"
npm test
-
Commit your code changes and push the commit to your remote code repository
Starter Code
This section provides additional "Hello, World!" starter code for working with
the web-sys package to add content to a webpage.
-
Follow the instructions in the previous sections
-
Add a dependency
cargo add js-sys
-
Enable additional web-sys features in Cargo.toml
[dependencies.web-sys]
version = "0.3.60"
features = [
  "CanvasRenderingContext2d",
  "Document",
  "HtmlCanvasElement",
  "HtmlDivElement",
  "Window",
  "console",
]
-
Replace the static/index.html file
<!DOCTYPE html>
<html>
<head>
<meta
  charset="utf-8">
<title>
Project Name
</title>
</head>
<body>
<script
  src="index.js">
</script>
<canvas
  height="25"
  id="canvas"
  width="100">
</canvas>
<div
  id="div">
</div>
</body>
</html>
-
Replace the src/lib.rs file
use js_sys::Object;
use wasm_bindgen::prelude::*;
use wasm_bindgen::JsCast;
use web_sys::console;
use web_sys::window;
use web_sys::CanvasRenderingContext2d;
use web_sys::Document;
use web_sys::Element;
use web_sys::HtmlCanvasElement;
use web_sys::HtmlDivElement;
use wee_alloc::WeeAlloc;

#[cfg(feature = "wee_alloc")]
#[global_allocator]
static ALLOC: WeeAlloc = WeeAlloc::INIT;

#[wasm_bindgen(start)]
pub fn main_js() -> Result<(), JsValue> {
  console_error_panic_hook::set_once();
  let document: Document = window().unwrap().document().unwrap();
  hello_canvas(&document);
  hello_console();
  hello_div(&document);
  Ok(())
}

fn hello_canvas(document: &Document) {
  let element: Element = document.get_element_by_id("canvas").unwrap();
  let html_canvas_element: HtmlCanvasElement = element.dyn_into().unwrap();
  let object: Object = html_canvas_element.get_context("2d").unwrap().unwrap();
  let canvas_context: CanvasRenderingContext2d = object.dyn_into().unwrap();
  canvas_context.set_font("normal 14px serif");
  canvas_context.stroke_text("Hello, Canvas!", 0.0, 14.0).unwrap();
}

fn hello_console() {
  console::log_1(&JsValue::from_str("Hello, Console!"));
}

fn hello_div(document: &Document) {
  let element: Element = document.get_element_by_id("div").unwrap();
  let html_div_element: HtmlDivElement = element.dyn_into().unwrap();
  html_div_element.insert_adjacent_text("afterbegin", "Hello, Div!").unwrap();
}
-
Run your automated tests
npm test
-
Manually test the webpage
npm start
-
In some browsers, you can press the F12 key to open the browser developer console
-
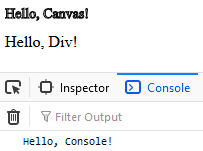
Including the browser developer console output, you should see the following:
-
Commit your code changes and push the commit to your remote code repository
Deployment
This section describes deployment of your application to a web server.
-
Follow the instructions in the previous sections
-
Run the npm run script "build"
-
This will make the deployment files in your distribution directory dist/
npm run build
-
Set the Node.js options environment variable
-
This is only necessary if you get an error message in the previous step
-
For details, see this
Stack Overflow question
export NODE_OPTIONS=--openssl-legacy-provider
npm run build
-
Using
cross-env
is an alternative to setting the environment variable at the command line
npm i -D cross-env
-
Update your npm run script in package.json to use cross-env
{
  [...]
  "scripts": {
    [...]
    "build": "rimraf dist pkg && cross-env NODE_OPTIONS=--openssl-legacy-provider webpack",
    [...]
  },
  [...]
}
-
Upload the distribution directory files (dist/*) to your web server
-
Test the uploaded webpage
Links
In recommended reading order
© 2022
CroftSoft Inc
|
|
| |
|
|
|